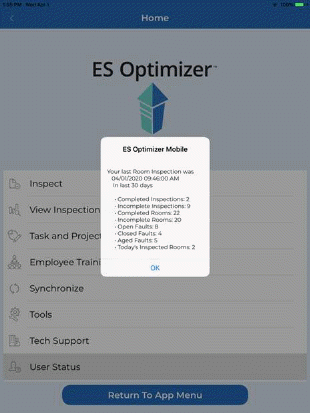
 allows you to use the ES Optimizer App
[Formerly Quality Management] in the HHD as shown below:
allows you to use the ES Optimizer App
[Formerly Quality Management] in the HHD as shown below:Tapping the ES Optimizer Mobile App icon allows you to use the ES Optimizer App
[Formerly Quality Management] in the HHD as shown below:
Below is a description of the buttons and fields found in ES Optimizer.
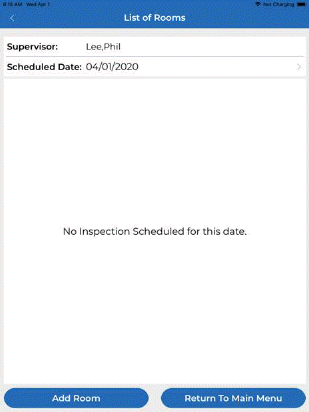
Inspect button – Allows the user to search for/add new inspections. The inspections are specified by the supervisor and date. Tapping this button opens the figure like the one below:

1. Tap on a date or “Add New Inspection” to open and complete or add inspection as shown below:
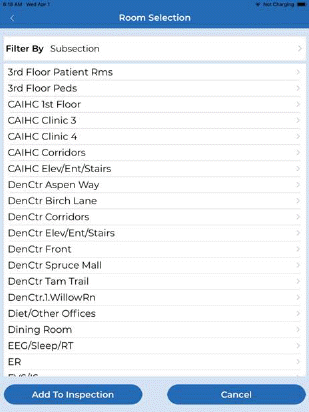
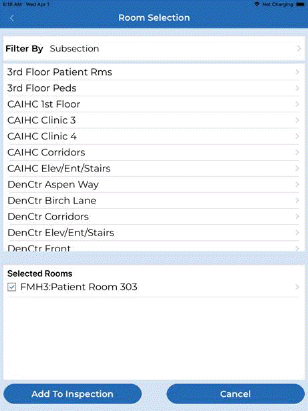
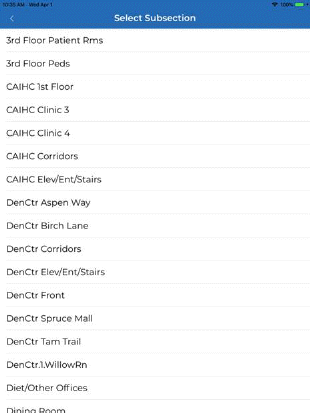
2. If adding a new Inspection or room tap “Add Room” as shown above left. Select the subsection from the list as shown above right.
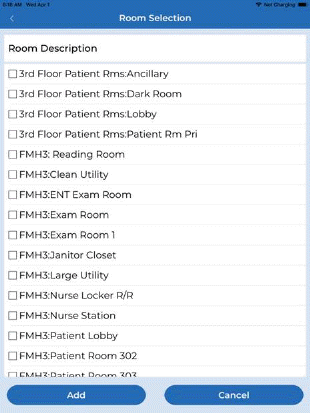
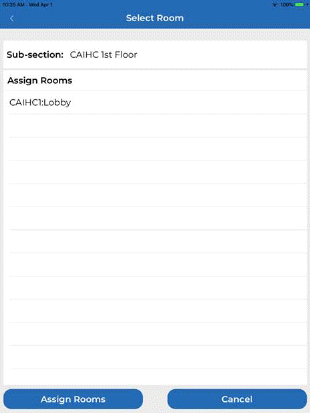
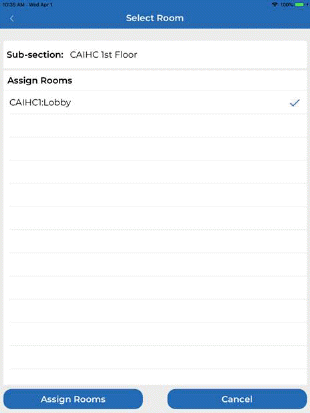
3. Select one or more rooms from the list shown above left and tap “Add”, you will see a screen similar to the one above right.
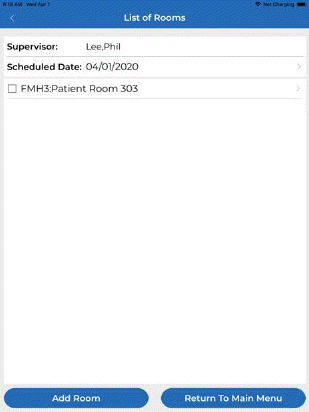
4. Tap “Add To Inspection”, and you will see the screen below left. You can tap the room you wish to inspect, or add more rooms, or return to the main menu.
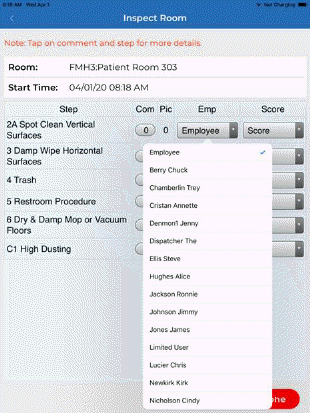
5. Begin by selecting the Employee who cleaned the room (above right). You’ll notice once you select him/her at the top of the step list it populates all the way through automatically as seen below:

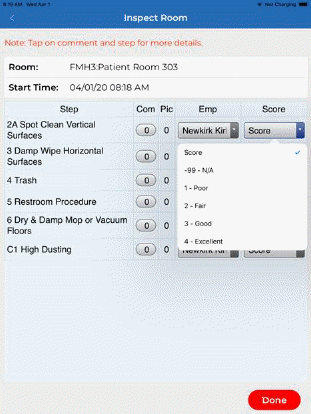
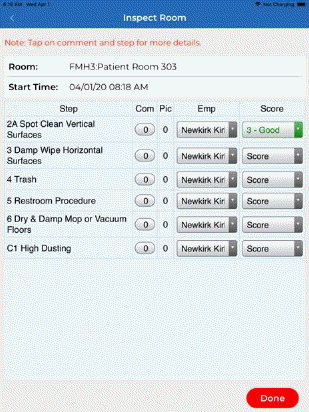
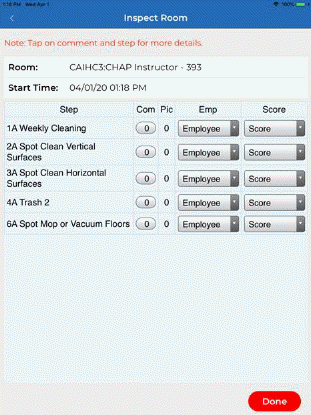
6. You may now select a score for each step by tapping the Score dropdown as shown above right.
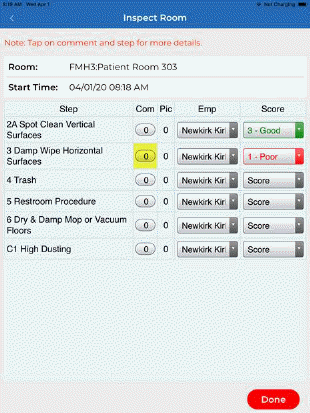
7. You
may enter a comment by tapping on the oval comment button  you will see this screen below left
whereby you can “Add a New Comment”.
you will see this screen below left
whereby you can “Add a New Comment”.

8. When you select “Add an New Comment” you may “Choose a Comment” from the comment list and/or you may enter the comment text in the custom text box.
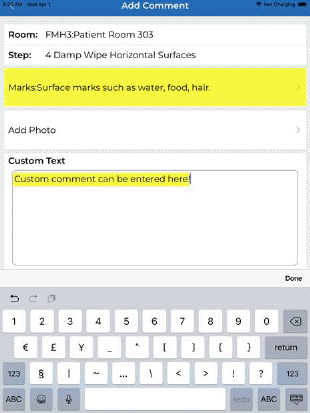
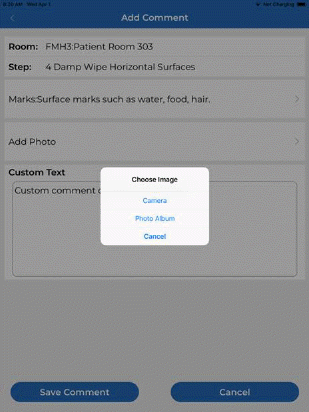
9. When
you’re finished with you comment you can “Add Photo” by using the camera or
choosing a photo from the Photo Album just follow the prompts. Upon first
camera use you will have to approve the app’s use of your camera. 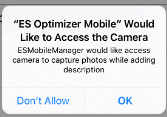 When you are done with the Comment
and Photo tap “Save Comment”.
When you are done with the Comment
and Photo tap “Save Comment”.
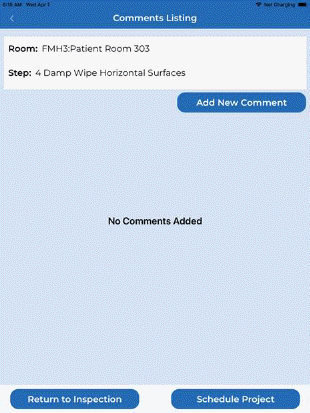
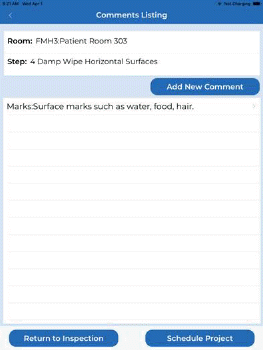
10. You will receive screen “Comments Listing” as shown below:

11. The comment listing page offers several options:
•You can edit the comment you just completed by tapping on the comment you wish to edit.
•You can “Add a New Comment” and optionally add another photo.
•You can “Schedule Project” cleaning to be done in the area inspected.
Since we have covered the first two, we will review how to “Schedule Project”
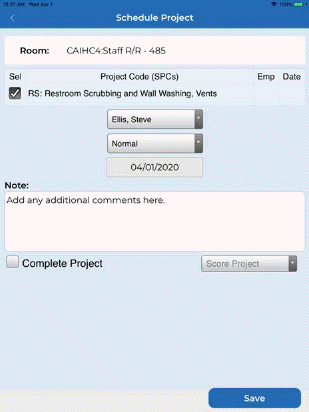
a) Tap on “Schedule Project” and the app will display the default cleaning projects available for this room from ES Optimizer Web as shown below:
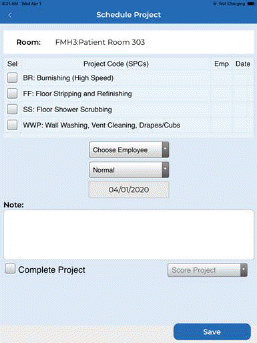
b) Select the project you want to schedule by tapping in the selection box to the left of it titled “Sel” for select.
c) Choose an Employee, Priority level, Date, and optionally make a Notation in the Note field as shown below then tap “Save”

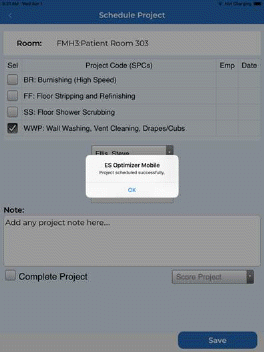
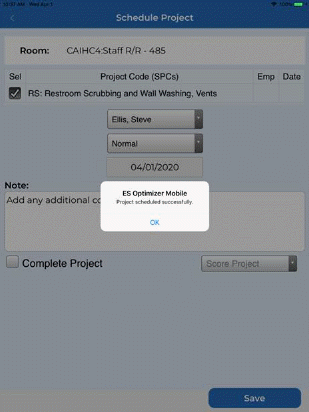
d) The app will attempt to synchronize to schedule the project in ES Optimizer Web.
e) Upon successful Synchronization you will need to tap “OK” to clear the project saved successfully dialogue box and you be placed back at the comments Listing page as shown below:
12. You will want to tap “Return to Inspection” unless you wish to make more comments, take more photos, or schedule more projects.
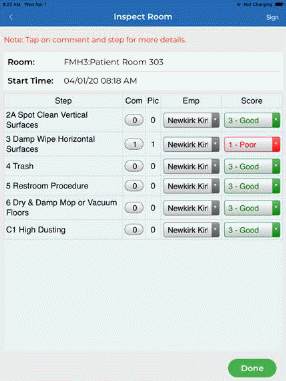
13. You will then be taken back to the Inspect Room screen. Notice how the Comment button and the Pic Column both have a “1” in them now indicating there is 1 comment and 1 photo attached to that cleaning step.
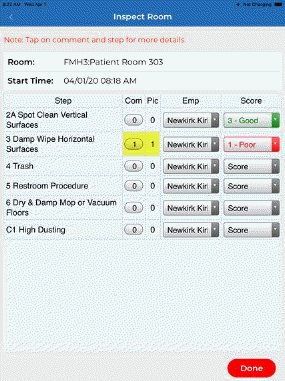
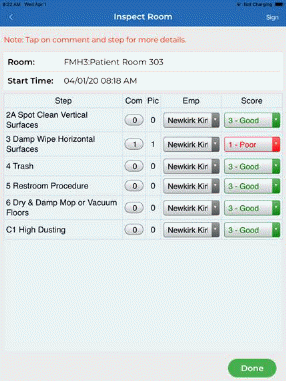
14. You can repeat the scoring for the remainder of the steps adding comments, photos or scheduling projects as you go. Note the “Done” button is red which indicates the inspection is not complete. It will turn Green once you have scored all steps.
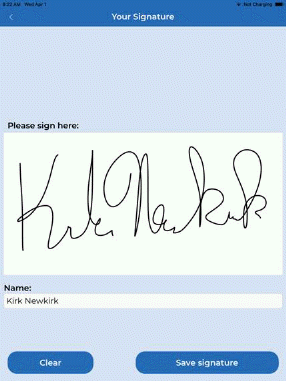
15. You may have noticed the “Sign” button in the top right corner once you have finished the inspection. If the employee is present while you inspect they can sign the inspection by tapping that button and then tapping “Save”.
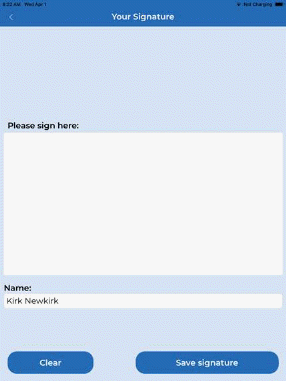
Note: If you would like ES Optimizer to prompt you to sign every inspection you can set this in the Tools Menu.
16. You will be returned to the inspection once it is signed. If you don’t need a signature simply tap “Done” and the inspection will be completed.

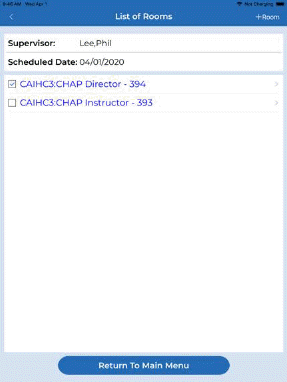
17. If inspecting more than one room you will see a screen similar to the one above right where a check mark is shown next to the room completed. You may Add another room using the “+Room” in the top right corner of the screen or tap on the next room in the list to inspect it.
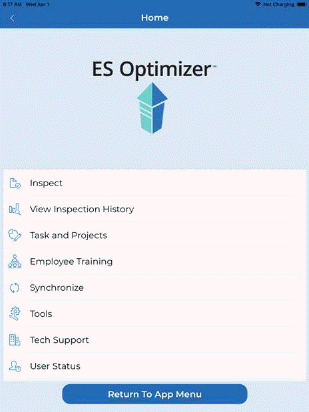
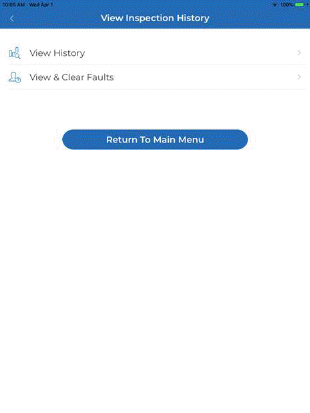
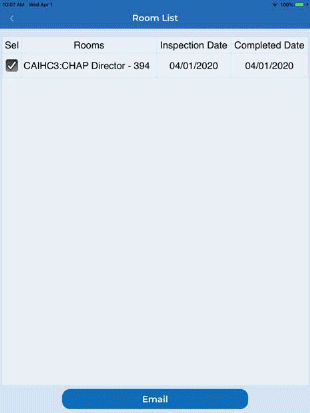
View Inspection History button – Allows the user to view the current history of the inspections, email completed inspections (provided email is installed on the device) and View & Clear Faults (if enabled). Tapping the View History & Clear Faults button opens the figure like the one below:
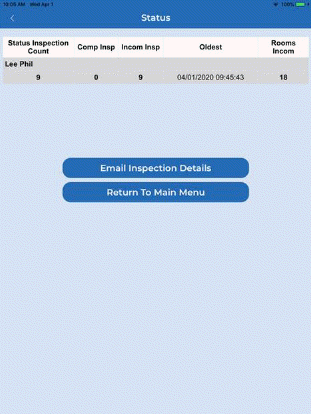
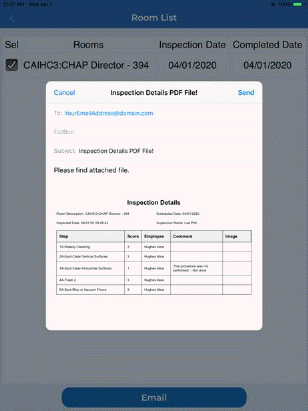
The View History button shows a summary screen of inspections completed as shown above right: you may Email Inspection Details of recently completed inspections using the Email Inspection Details button as shown below left. Select the room from the rooms list as shown below right:
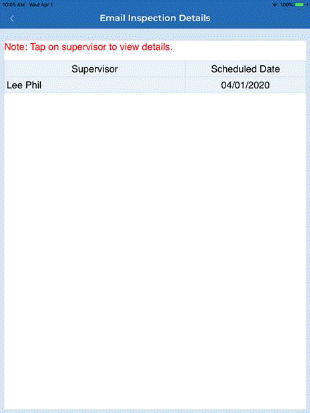

Tap the Email button and enter the email address and tap the Send button as shown below left. You will be taken to the room list view where you may email the Inspection again or use the back “<” icon to return to the previous pages as needed.
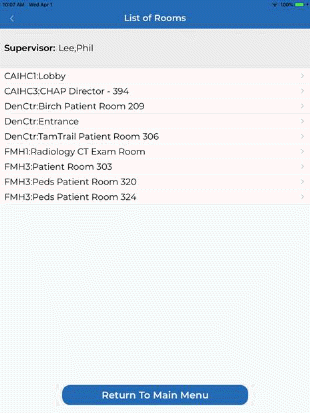
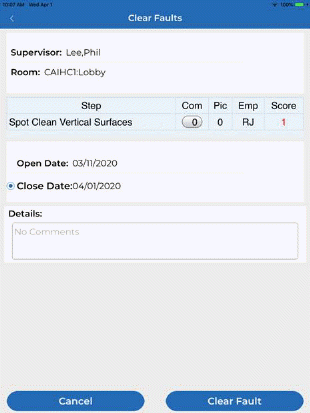
The View & Clear Faults button (if faults are enabled) – See (ES Optimizer Preferences Facility Settings) allows you to view and clear faults or failing steps from a list of affected rooms as shown below left: Upon selection the fault details will be shown below right:
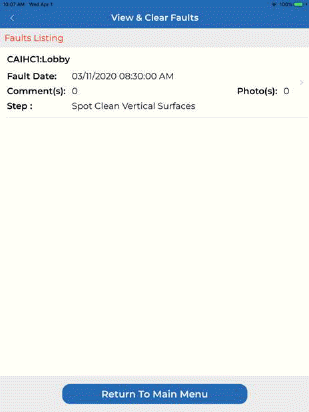
You may tap on any fault listed (above right) to update or “Clear Fault” as shown below left.
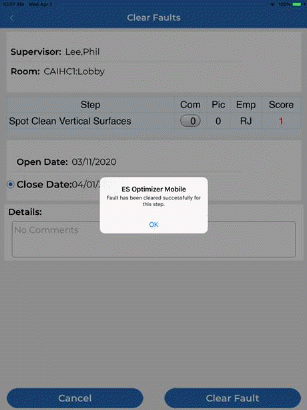
Tap “Clear Fault” and the screen at right will display. User will confirm by tapping “OK”.
Task and Projects – Allows the user to add/view/schedule and complete tasks and projects as shown below:
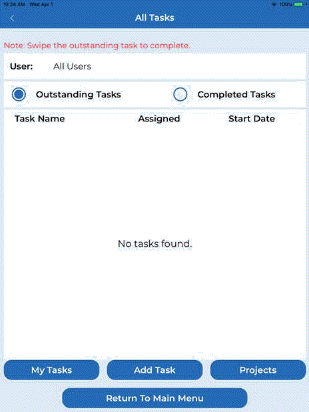
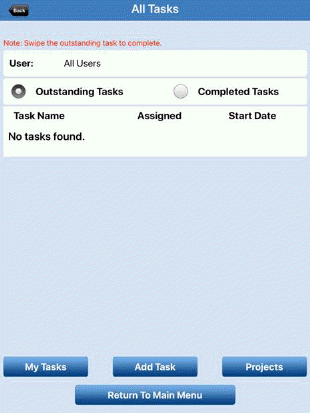
1. All Tasks – displays task by all user or selected user (tap user to change). You can view either outstanding tasks or completed tasks as shown below:

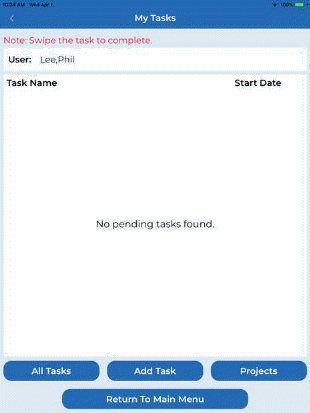
My Tasks – displays the tasks assigned to the user that is logged in as shown below left:

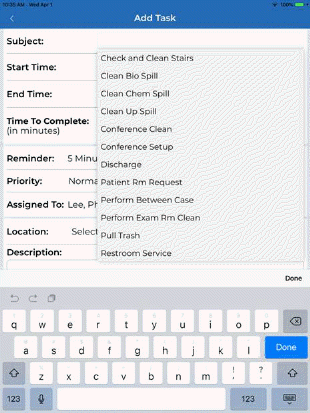
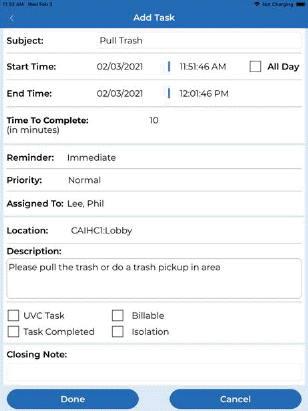
Add Task – allows the creation of a task (default or custom) to be assigned to an ES Optimizer user for a selected location (including their assigned rooms if applicable) as shown below left:
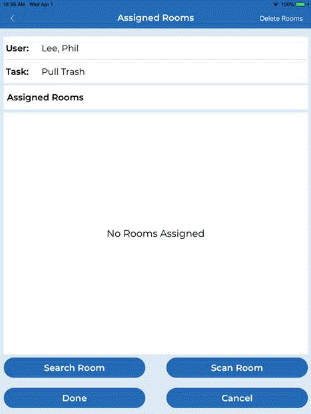
1. When adding a location user may “Scan Room”(QR Code), Select by “Assigned Rooms”(if applicable), or search by Subsection/Room as shown below right:
2. Since there are no assigned rooms for this user you may use the Search Room button to select a room as shown below:
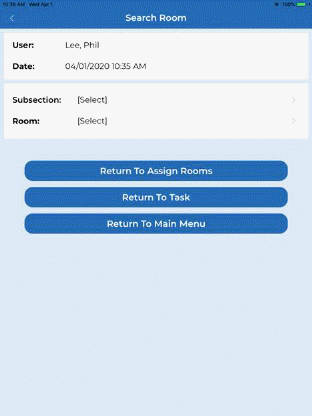
3. Select a subsection and a room from the list
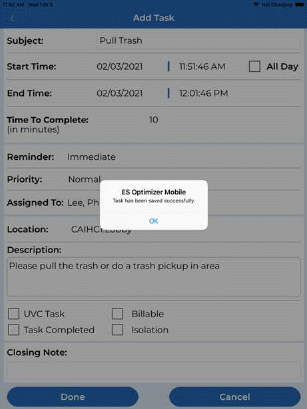
4. Once all selections and data has been entered as desired user may complete the task by selecting “Done” as shown below left, which will produce the completed task as shown below right. User will need to tap “OK” to the task save dialogue box displayed.
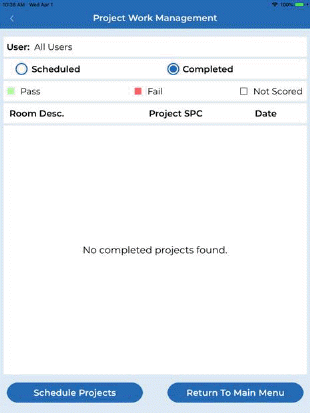
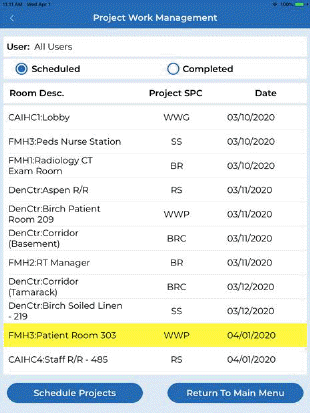
1. Projects – button shows projects by all users or selected user (tap user to change). You can view either outstanding tasks or completed tasks as shown below:
Note: You may tap the user field and change the Scheduled or Completed view to by employee.
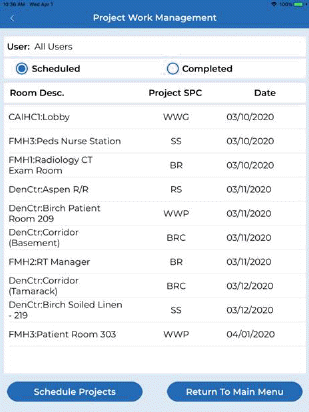
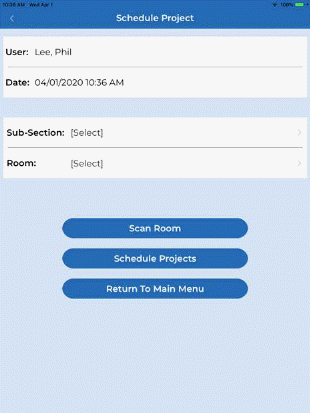
Schedule Projects – button allows user to schedule projects by scanning a QR code using the Scan Room Button or by selecting the subsection and room where they wish to perform the project as shown below:
Select the Employee, The priority level, and the date to perform and tap “Save”. You will see the screen shown below:
You may have noticed the “Complete Project button and the select score drop down above left. These can be used to log the scheduled project complete and also rate the project work quality (Pass/Fail).
Completing a Project – Open Tasks and Projects and select “Projects”. Next you can select the user or all users, then “scheduled projects” and tap on the project you would like to complete you will see these screens below.

You may update any of the project information you see as needed. Next check the Complete Project Box, and select the inspection score by tapping “Select Score ”Pass/Fail" and finally “Save” to complete the project.
Employee Training – The Employee Training Module lets you schedule, conduct and Complete training classes all within ES Optimizer mobile. Opening Employee Training displays the menu shown below:

Schedule Class – Tapping the schedule class button opens the Add/Edit schedule screen.

1. You may change the view to My Classes or All radio buttons at the top of the screen as shown below:
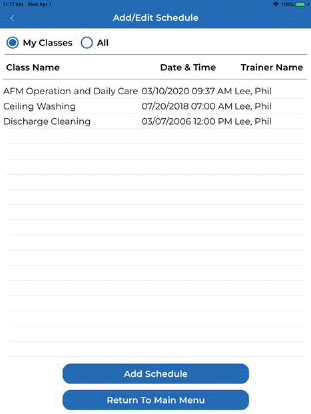
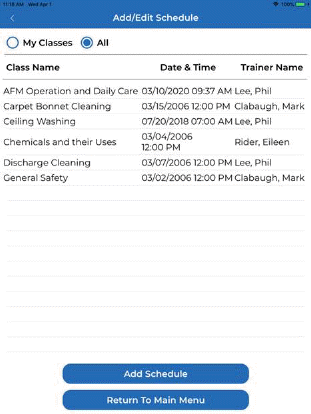
Note: The classes scheduled in ES Optimizer Web or Mobile will display.
2. User may schedule a new class by using the Add Schedule button as shown below:
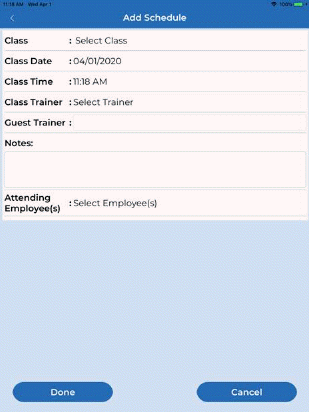
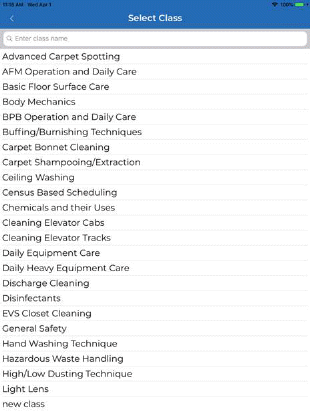
3. Tap on “Select Class” and pick a class to schedule.


4. Tap “Select Trainer” and select a trainer as shown above.
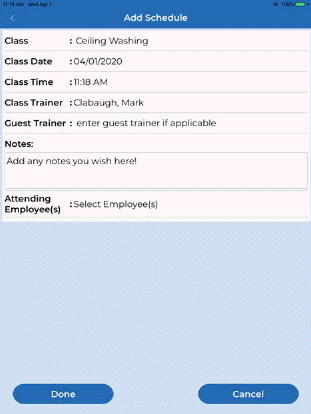
5. Enter a Guest Trainer if applicable and any Notes pertinent to the class as needed.
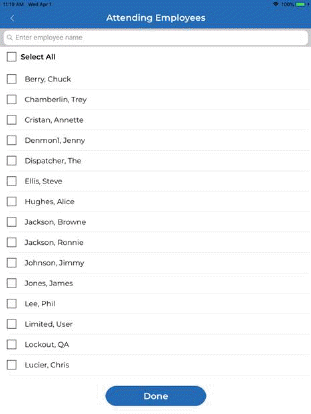
6. Tap “Select Employee(s)” and select all or the employees attending the class as shown below:
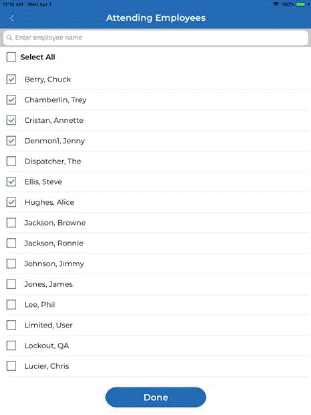
7. Tap “Done” when you have selected the employees scheduled for the class.
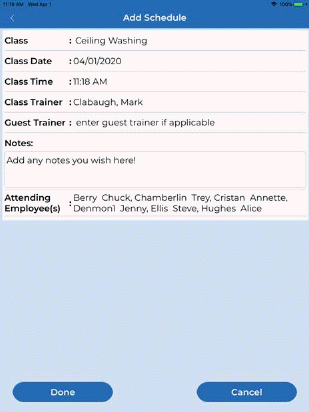
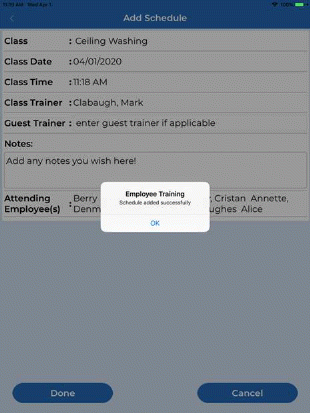
8. The employee’s names will appear as shown above left. Synchronization will occur resulting in the completion dialogue shown above right.
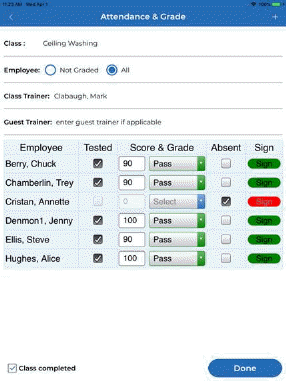
Attendance & Grade – The Attendance and Grade menu allows the class attendance and quiz grade (if applicable) to be entered for each scheduled employee. The screen shown below will display:
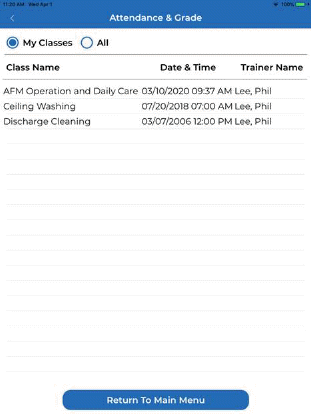
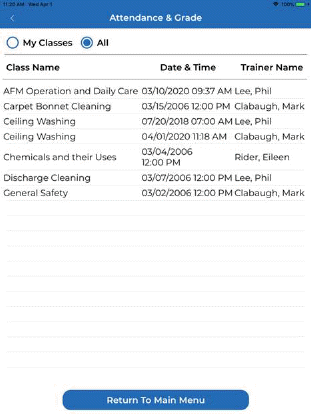
1. User may select “My Classes” or “All” classes to display the class they wish to log attendance and grade. Tap the class to open the Attendance and Grade screen shown below:
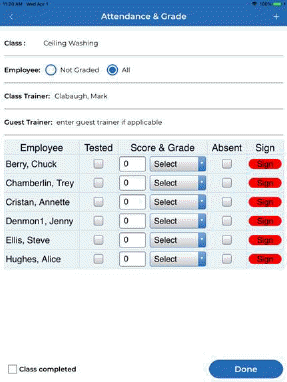
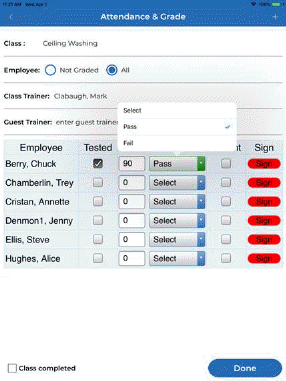
2. Select the Tested checkbox and enter the score if a quiz was given and graded. Select Pass or Fail as needed shown above. If a score was entered in ES Optimizer web as a Passing threshold, the pass/Fail will update automatically based upon score entered. Score can be manually overridden if needed.
Note: If user did not attend as planned check the "Absent" checkbox.
3. User may electronically sign by tapping the red Sign button. Sign will be greyed and un-selectable if “Signature Required” was not selected in Employee Training., otherwise, the screens shown below will be shown:
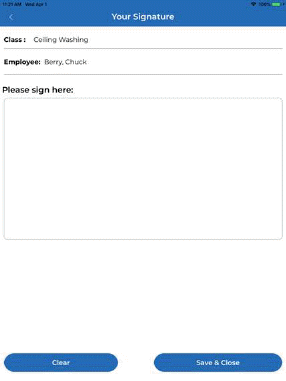

4. If user makes a mistake the “Clear” button can be used to erase the signature and re-sign. When signature is complete tap “Save & Close” the screen below will be shown:

5. You’ll notice the “Sign” button changes color to Green. Repeat the steps to score, Grade, Sign, or absent for all user and then check the class complete box as shown below left:
6. The class will appear in ES Optimizer Web as complete.
Synchronize (Employee Training) – the synchronize button allows for manual synchronization process ensuring the data entered in ES Optimizer web Employee Training Module is the same as that contained within the ES Optimizer Mobile Application.
Facility (Employee Training) – The Facility is displayed for those users with multiple facilities in their database so they can visually see the facility for which they are managing Employee Training. User can change the facility from the main menu by tapping the facility name and selecting an alternate facility.
Synchronize button (Home Menu) – Allows the user to synchronize the inspections with the cloud. Any inspection stored in the cloud that is not completed will be transferred to the device. Tapping this button opens the figure below:
Tools button – Allows the user to configure the HHD. Tapping the “Tools” button opens the figure below:
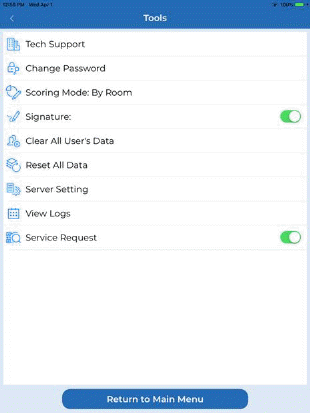
From here, the user has access to App settings. Below is a description of the buttons in the Tools Menu:
Facility Code – This button allows the user to change the facility he/she is inspecting.
Scoring Mode – This button allows the user to switch
between Scoring by Step and Scoring by Room. Below left is by “Step” and
below right is by “Room”. 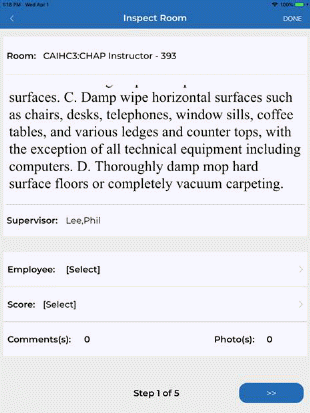
Signature – This button allows the user to turn on or off the Ask for Signature dialogue that is displayed when completing an inspection. This will be a digital signature to be stored with the inspection. NOTE: User may use the “Sign” button in the top right corner of the complete inspection box to add a signature as needed.
Clear All User’s Data – This button allows the user to clear any inspection data related to the user.
Reset All Data – This button allows the user to take the app back to the “factory setting.” It will be like the app was just installed the first time.
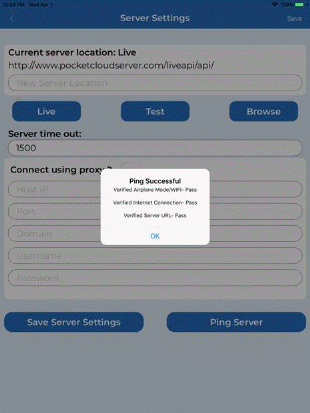
Server Settings – This button opens the figures below:

The user can set server settings here if their internet access goes through secure network settings. The Ping Server button can be quite useful when testing application connectivity to the server over a network as shown below:
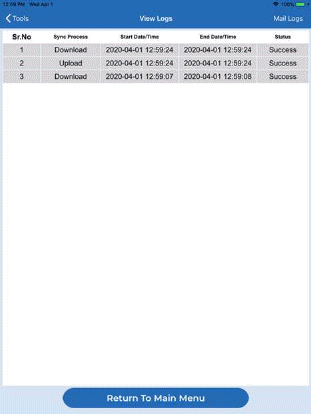
View Logs button – This button allows the user to view the synchronization logs that have occurred with the HHD. Tapping this button opens the figure like the one below:
Tapping on the Mail Logs button in the View Logs screen opens the figure below.
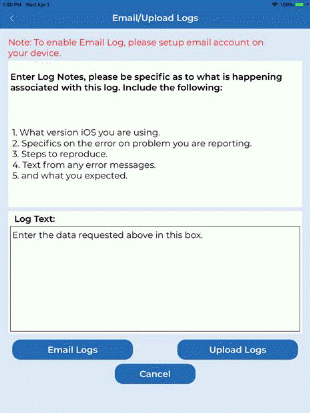

Enter the information requested in the Log Text box and tap Upload Logs.
User can also Email Logs if an email account is available on the Apple device.
NOTE: It is important to add the five pieces of information requested on this screen as it will greatly enhance troubleshooting any issues.
Service Request (slider) – If you have purchased
Service Optimizer the user can control if they will receive service
requests. If you answered yes to the prompt when opening the
application:  this slider will
be green (on). If you do not wish to receive service requests slide it
off.
this slider will
be green (on). If you do not wish to receive service requests slide it
off.
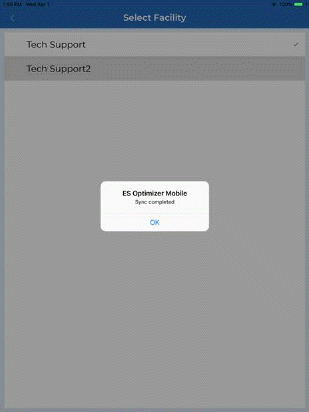
Facility (Home Menu) – Tapping the Facility name allows the user to change the facility they are using in ES Optimizer as shown below:

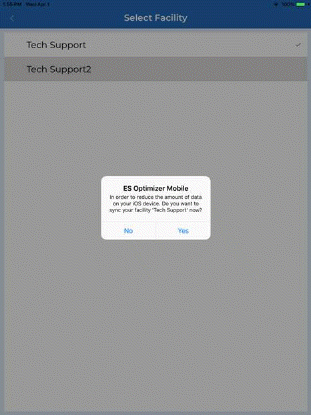
As you can see the synchronization is complete below left, and the alternate facility is now selected, below left.
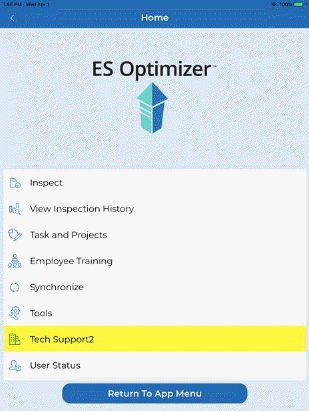
User Status (Home Menu) – Tapping the User Status button on the main menu displays a screen similar to the one below: